Checking the Status of Your Vapor Barrier
Apr 24, 2024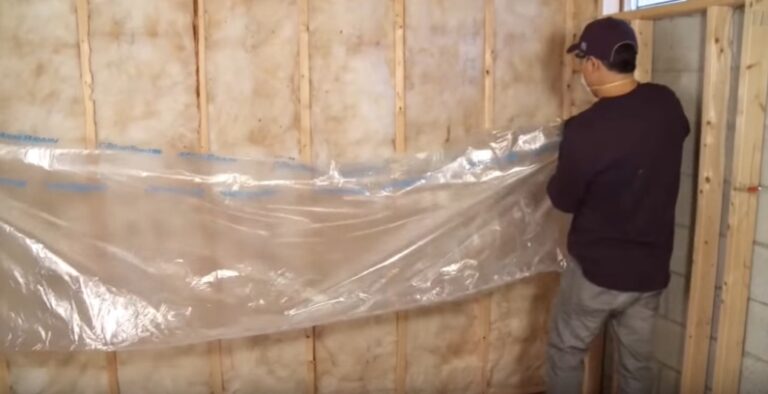
Checking the Status of Your Vapor Barrier
Are you confident that your vapor barrier is keeping your home protected? If not, it’s time to roll up your sleeves and check the status of this crucial component. Understanding the importance of a vapor barrier and knowing how to detect any issues can save you from potential headaches down the road. Let’s dive into the world of vapor barriers together! Contact Rescon Basement Solutions today for help on your next vapor barrier issue!
Checking the Status of Your Vapor Barrier
Curious about the condition of your vapor barrier? It’s a smart move to stay on top of its status. Your vapor barrier plays a key role in protecting your home from moisture and potential damage, so regular checks are essential.
Taking the time to inspect your vapor barrier can give you peace of mind and ensure that it’s doing its job effectively. By being proactive, you can spot any issues early on and address them before they escalate.
Whether you’re a seasoned DIY enthusiast or prefer professional help, knowing how to assess your vapor barrier is empowering. Let’s explore the steps to check its status together!
Understanding the Importance of a Vapor Barrier
When it comes to your home, a vapor barrier plays a crucial role in maintaining its overall health and structural integrity. This protective layer helps prevent moisture from seeping into the walls and floors of your property, ultimately safeguarding against mold growth and rot.
By installing a vapor barrier, you are not only protecting your home but also ensuring the longevity of its components. Without this barrier in place, excess moisture can lead to costly repairs down the line. It acts as a shield against water damage, helping to keep your indoor environment safe and healthy for you and your family.
In regions with fluctuating temperatures or high humidity levels, a properly functioning vapor barrier is even more essential. It serves as a defense mechanism against outside elements that could compromise the comfort and stability of your living space.
Signs of a Damaged Vapor Barrier
A damaged vapor barrier can lead to various issues in your home. Look out for sagging or torn sections; these could indicate moisture has compromised the barrier’s integrity. Mold or mildew growth near the walls and floors might suggest a leak or tear in the vapor barrier, allowing excess moisture to seep through. Inconsistent temperature levels within your home, especially noticeable on different floors, could be a sign that the vapor barrier is not functioning correctly. It’s essential to address any signs of damage promptly to prevent further problems down the line.
Steps to Inspect Your Vapor Barrier
To ensure your vapor barrier is doing its job effectively, conducting regular inspections is crucial. Start by visually examining the barrier for any tears, holes, or signs of wear and tear. Look out for gaps in seams or areas where the barrier may have detached from the surface.
Next, check for any moisture accumulation between the vapor barrier and the insulation. Excess moisture can indicate a compromised barrier that needs immediate attention to prevent mold growth and structural damage. Use a flashlight to inspect hard-to-reach areas thoroughly.
Assess if there is adequate insulation behind the vapor barrier. Insufficient insulation can lead to energy loss and decreased efficiency in regulating temperature and humidity levels within your space. Consider consulting a professional if you notice any issues during your inspection process to address them promptly.
Visual Inspection
When it comes to maintaining the integrity of your home, a visual inspection of your vapor barrier is crucial. Start by checking for any tears, holes, or gaps in the barrier. These openings can allow moisture to seep through, compromising its effectiveness.
Inspect the overall condition of the vapor barrier. Look for signs of sagging or deterioration that may indicate a need for repairs or replacement. Ensure that the barrier is properly sealed around pipes, vents, and other penetrations to prevent air leakage.
Take note of any discoloration or mold growth on the surface of the vapor barrier as these are indicators of potential moisture issues. Regular visual inspections can help you catch problems early and maintain a healthy environment in your home.
Checking for Moisture
One crucial aspect of assessing the status of your vapor barrier is checking for moisture. Excessive moisture can compromise the effectiveness of the barrier, leading to issues like mold growth and structural damage. To start, visually inspect the barrier for any signs of water droplets or dampness. Look out for discoloration or a musty odor as indicators of potential water intrusion.
Another way to check for moisture is by using a moisture meter. This tool can detect elevated levels of humidity within the walls or under flooring where the vapor barrier is installed. Pay close attention to areas near plumbing fixtures, windows, and doors where leaks are more likely to occur.
If you notice any signs of excessive moisture during your inspection, it’s essential to address them promptly. Repairing leaks and ensuring proper ventilation in your home can help maintain the integrity of your vapor barrier and prevent further damage.
Testing for Adequate Insulation
When it comes to testing for adequate insulation in your vapor barrier, there are a few key things to keep in mind. First, ensure that the insulation material is evenly distributed throughout the barrier. This will help maintain consistent temperature control and prevent moisture buildup.
Check for any gaps or tears in the insulation layer that could allow air or moisture to seep through. These weak spots can compromise the effectiveness of your vapor barrier and lead to potential issues down the line.
Consider using a thermal imaging camera to identify any areas where insulation may be lacking or damaged. This tool can provide valuable insight into the overall condition of your vapor barrier and help you make informed decisions about necessary repairs or upgrades.
DIY vs Professional Assessment
When it comes to checking the status of your vapor barrier, you might wonder whether to tackle the assessment yourself or call in a professional. DIY inspection can be a cost-effective option for those comfortable with basic maintenance tasks. By visually inspecting for tears, holes, or signs of moisture and ensuring proper insulation, you can get a general idea of your barrier’s condition.
However, if you’re unsure about what to look for or suspect significant damage, hiring a professional could provide peace of mind. Experts have the knowledge and tools to conduct thorough assessments and recommend necessary repairs to maintain an effective vapor barrier. Deciding between DIY and professional assessment depends on your comfort level and the complexity of the task at hand.
Maintaining and Repairing Your Vapor Barrier
Maintaining and Repairing Your Vapor Barrier
Regular maintenance of your vapor barrier is essential to ensure its effectiveness. Keep an eye on any signs of damage or wear, such as tears, holes, or moisture buildup. Promptly repair any issues to prevent further damage to your home’s insulation.
By following these simple steps and staying proactive in inspecting and maintaining your vapor barrier, you can ensure that it continues to protect your home from moisture intrusion effectively. Remember, a well-maintained vapor barrier not only improves energy efficiency but also helps in preventing costly repairs down the line. Stay vigilant and keep your vapor barrier in top-notch condition for a healthier and more comfortable living environment! Contact Rescon Basement Solutions today for help on your next vapor barrier issue!