How to Install a Bulkhead Door
Apr 22, 2024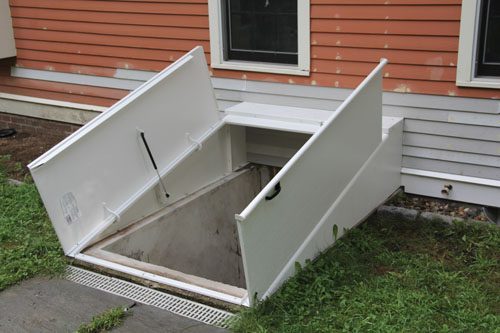
How to Install a Bulkhead Door
Are you looking to add functionality and style to your home? Installing a bulkhead door might be the perfect solution for you! Whether you’re renovating or building from scratch, this guide will walk you through the steps to install a bulkhead door like a pro.
Preparation Steps
Before you dive into installing a bulkhead door, proper preparation is key to a successful project. First things first, out with the old! Remove any existing door or structure in the area where your new bulkhead will go. This sets the stage for a clean slate and ensures a smooth installation process.
Next up, prepare the foundation where the bulkhead will sit. Make sure the area is level and free of debris to provide a stable base for your new door. Taking care during this step will help prevent issues down the road and ensure a secure fit for your bulkhead.
Don’t forget to prep the wall surrounding the installation site. Check for any damage or obstacles that could interfere with mounting the new door. Addressing these details upfront will streamline the assembly and placement of your bulkhead door later on.
Out with the old
Are you ready to give your home a fresh look with a new bulkhead door? Before diving into the installation process, it’s crucial to remove the old door first. Start by carefully unscrewing any hinges or bolts holding the existing door in place. Be sure to have someone help you lift and remove the heavy door safely.
Once the old bulkhead door is out of the way, take some time to inspect the foundation and wall where the new one will be installed. Look for any signs of damage or wear that may need attention before proceeding with installing your shiny new bulkhead door.
Prepare the foundation
Before diving into the installation process of your bulkhead door, it’s crucial to ensure that the foundation is properly prepared. Start by clearing any debris or obstructions around the area where the new door will be installed. This step will help create a clean and stable base for your project.
Next, check for any potential water damage or rot in the existing foundation. Repair any issues before proceeding with installing the bulkhead door to prevent future problems down the line. Taking care of these details now can save you time and headaches in the long run.
Make sure that the foundation is level and secure before moving on to installing the frame. A solid foundation is key to ensuring a smooth and successful installation process for your bulkhead door.
Prepare the wall
Before installing a bulkhead door, it’s crucial to prepare the wall properly. Start by clearing the area around where the new door will go. Remove any debris or obstructions that may hinder the installation process. This step ensures a clean workspace and easier access to work on the wall.
Next, inspect the wall for any damages or imperfections that need addressing before proceeding with the installation. Repair any cracks or holes using appropriate materials to ensure a smooth surface for mounting the bulkhead door securely. A well-prepped wall sets a solid foundation for successful installation without unexpected hiccups along the way.
Measure and mark out where precisely the new bulkhead door will be placed on the wall. Double-check your measurements to avoid inaccuracies that could lead to misalignment during assembly. Taking these meticulous steps in preparing your wall guarantees a seamless installation process and long-lasting results once your bulkhead door is in place.
Assembly and Installation
Assembling the new door is a crucial step in installing a bulkhead door. Ensure you carefully follow the manufacturer’s instructions for assembling all components correctly. Take your time to check that everything fits together snugly before proceeding to the installation phase.
When it comes to installing the frame, make sure it is level and plumb. Use shims if necessary to ensure a tight fit against the wall. Secure the frame in place with screws or bolts provided in your assembly kit. Double-check all measurements and alignments before finalizing this step.
Proper assembly and installation of your bulkhead door are essential for its functionality and longevity. Pay attention to detail throughout this process to ensure a secure and weather-tight seal once completed.
Assembling the new door
When assembling a new bulkhead door, start by unpacking all the components and laying them out for easy access. Follow the manufacturer’s instructions carefully to ensure proper assembly. Make sure you have all the necessary tools on hand before starting.
Begin by attaching the hinges to the door panels according to the provided guidelines. Once this step is complete, connect the door handle and any additional hardware required for operation. Double-check that everything is securely fastened before moving on.
After assembling the door, test its functionality by opening and closing it several times. This will help identify any potential issues that need to be addressed before installation.
Installing the frame
When it comes to installing the frame for your bulkhead door, precision is key. Start by ensuring that the frame fits perfectly into the opening you’ve prepared in the wall. This step is crucial as any misalignment can cause issues down the line.
Use shims to adjust and level the frame as needed before securing it tightly in place with screws or nails. Make sure to double-check that everything is square and plumb before moving on to ensure a seamless installation process.
Once the frame is securely in place, test the door’s operation multiple times to ensure smooth opening and closing. Properly installed frames are essential for a functional and long-lasting bulkhead door setup.
Finishing Touches
After successfully installing the bulkhead door, it’s time to add those final touches that will not only enhance the appearance but also ensure its durability. Begin by capping the foundation with a durable material that can withstand weather elements and prevent any water seepage. This step is crucial in protecting your door from potential damage over time.
Next, focus on flashing and finishing techniques around the edges of the door. Properly installing flashing will help redirect water away from the structure, preventing leaks or moisture buildup. Take your time to seal all gaps and seams effectively, ensuring a tight fit that keeps out drafts and pests.
Remember, attention to detail during these finishing touches will not only improve the aesthetics of your bulkhead door but also contribute to its longevity and functionality.
Capping the foundation
Capping the foundation is a crucial step in installing a bulkhead door. This process involves creating a watertight seal between the foundation and the new door to prevent any moisture from seeping through. To begin, measure and cut the cap material to fit securely over the top of the foundation. Make sure it overlaps slightly on all sides for optimal protection.
Next, apply a generous amount of waterproof sealant along the edges where the cap will be placed. Press down firmly to ensure a tight bond and then secure it in place using screws or nails for added reinforcement. Once secured, double-check for any gaps or areas that may need additional sealing before moving on to the next step.
Inspect your work carefully to confirm that there are no weak spots or potential entry points for water infiltration. Properly capping the foundation sets a solid foundation for your bulkhead door installation and helps maintain its longevity over time.
Flashing and finishing techniques
After following these steps, you should now have a successfully installed bulkhead door that not only adds functionality and convenience to your home but also enhances its aesthetic appeal. Remember to take your time during each stage of the installation process to ensure everything is done correctly. By properly preparing the area, assembling and installing the new door, and finishing off with capping the foundation and applying flashing techniques, you can enjoy a sturdy and secure bulkhead door for years to come. Now go ahead and admire your handy work! Click here to learn how Rescon Basement Solutions can help you today!